Raspberry Pi in Read-only mode
Playing with Raspberry can be frustrating, if continuous filesystem corruptions occur. The proplem is SD memory card used as root file system. SD technology can't tolerate continuous write operations, and eventually gets broken. Also if power is turned off randomly without software shutdown, a partial disk write may occur causing filesystem corruption.
There is simple trick to avoid the problem, and effectively make Raspberry to last forever, even if power outages occur frequently: Mount filesystem read-only
In case any of configuration changes occur or further development needed, the filesystem can be mounted temporarily in read-write mode. If there is need to store any data permanently, an external USB mass storage device can be used for that purpose.
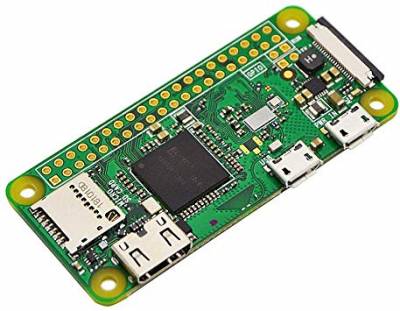
Pi Zero W
Pi Zero W is very handy small inexpensive single-board-computer with dimensions of only 61×35 mm. Due to it's constrained interfaces and limited computing power, PiZero is typically run in headless mode with no user interface.
PiZero model W has Wifi interface included, thus power source via micro-USB connector is only thing needed to run the device. However, installation and configuration can be a bit more tricky.
There are instructions available in the internet how to configure Wifi by editing configuration files ar the SD card when attached to another host computer. However, I have found it most convenient to configure it by using normal Raspberry Pi 2/3/4.
Procedure to set up Wifi for Pi Zero W:
- Write your image to the SD card at host computer
- Make ssh server accessible by touching /boot/ssh file
- Unmount disk and put it in full size Raspberry with Ethernet interface connected
- Log in with ssh
- Run 'sudo raspi-config' and configure your wifi settings. You can make other configurations as well like expanding filesystem and setting hostname.
- Shutdown Raspberry Pi and swap SD card to Pi Zero W.
- Power PiZero and log in with ssh over wifi
- Continue further configurations, like running the installation script below.
Installation script
This installation script will update software packages, install Node-RED and make the filesystem read-only. It also makes login console available in USB OTG interface, which is handy in case of any network connectivity problems occur.
Run the script in your target system (inside Raspberry). The installation script is tested with latest Raspbian Buster lite image and Raspberry Pi Zero W and Pi3.
In case of Pi3, the USB OTG section needs to be removed, as that interface does not exists in Pi3 hardware.
#!/bin/bash
# Raspberry Pi Zero W
# Enable USB login console, install Node-Red, and make Read-Only file-system.
# Tested with Rasbian Buster Lite.
# Jaakko Ala-Paavola 2020-01-05
#
# This script is based on information from following sources:
# https://mad-tinkerer.me/raspberry-pi/read-only-root-filesystem-debian-buster/
# https://www.tal.org/tutorials/raspberry-pi-zero-usb-serial-console
#

echo "*** UPDATING SYSTEM ***"
apt update
apt upgrade -y
apt install busybox-syslogd -y
sed -i 's/PrivateTmp=yes/PrivateTmp=no/' /lib/systemd/system/systemd-hostnamed.service

echo "*** Enable login console in USB OTG ***"
echo " dtoverlay=dwc2" >> /boot/config.txt
echo " modules-load=dwc2,g_serial" >> /boot/cmdline.txt
systemctl enable getty@ttyGS0.service

echo "*** CREATE RAM FILESYSTEM ***"
echo 'none    /tmp            tmpfs   size=28M,mode=01777 0 0' >> /etc/fstab
echo 'none    /var/log         tmpfs   size=16M 0 0' >> /etc/fstab
mount -a

echo "*** DISABLE EXTRA SERVICES ***"
systemctl disable dphys-swapfile.service
systemctl disable apt-daily.service apt-daily.timer apt-daily-upgrade.timer apt-daily-upgrade.service
systemctl disable logrotate.service logrotate.timer

echo "*** CREATE MOUNT SCRIPTS ***"
echo "alias rw='sudo mount / -o remount,rw;  sudo mount /boot -o remount,rw'" >> .bashrc
echo "alias ro='sudo mount / -o remount,ro; sudo mount /boot -o remount,ro'" >> .bashrc

echo "*** INSTALL NODE-RED ***"
apt install nodered -y
systemctl enable nodered.service

echo "*** MAKE FILESYSTEM READ-ONLY ***"
sed -i 's/vfat    defaults/vfat    defaults,ro/' /etc/fstab
sed -i 's/ext4    defaults/ext4    defaults,ro/' /etc/fstab

echo ""
echo "***************************************************************"
echo "* All is ready now for read only operations. Rebooting now.   *"
echo "* For any further editing, run command line command ’rw’.     *"
echo "***************************************************************"
echo ""
sleep 1
reboot
For your convenience, the installation script creates to bash scripts: 'rw' and 'ro'. When running the filesystem in read-only mode, executing
rw
on command line mounts it in read-write mode. Correspondingly
ro
mounts the filesystem in read-only mode.
